
A patch only works as designed if it stays in full contact with your skin. These steps cover placement, adhesion, rotation and troubleshooting. Always follow the package insert for wear time — this guide covers the practical technique. (Product overview: P-Protect review.)
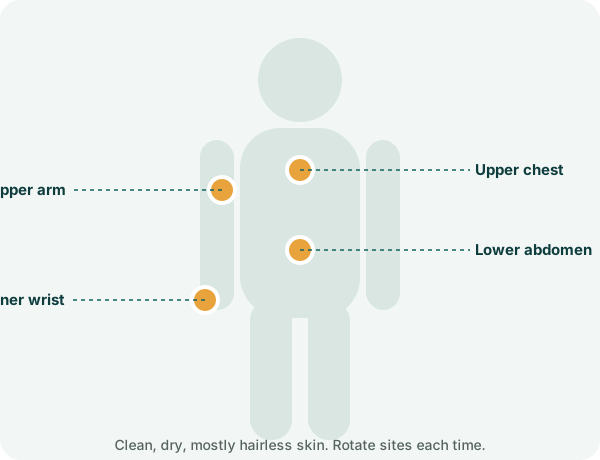
Step-by-step
- Choose a site. Lower abdomen, upper arm, upper chest or inner wrist work for most people. Avoid joints that bend a lot, scars, cuts and irritated skin.
- Clean and dry. Wash with plain water or mild soap and dry completely. Skip lotion, oil or sunscreen on that spot.
- Trim, don't shave. If the area is hairy, trim with scissors. Fresh shaving can irritate skin under adhesive.
- Peel and apply. Remove the backing without touching the sticky side, then place the patch.
- Press for 10–20 seconds. Use your palm to seal the edges fully.
- Wear as directed. With 10 patches per monthly pack, each is designed to be worn longer than a day — check the insert for exact timing.
- Remove gently and rotate. Peel slowly, fold the used patch in half (sticky sides together) and dispose of it. Use a different site next time.
If the patch won't stay on
- Make sure the skin is completely free of lotion or sweat when applying.
- Avoid very hot showers or saunas right after application.
- Choose a flatter site with less movement and less clothing friction.
- Ask the seller whether medical tape over the edges is acceptable.
If your skin gets irritated
Remove the patch, wash the area, and let it recover before using that site again. Persistent rash means stop — see P-Protect side effects and, if needed, our refund guide.
Why contact matters
Transdermal products release their contents slowly into the skin they touch. Lifted edges mean less contact. Our explainer on how transdermal patches work goes deeper.
Ready to start? The 6-pack is the lowest price per pack on the official website.
See bundlesFrequently asked questions
Where is the best place to put the P-Protect patch?
Clean, dry, mostly hairless skin such as the lower abdomen, upper arm, upper chest or inner wrist. Rotate sites each time.
Can I shower with the P-Protect patch on?
Follow the package insert. In general, avoid very hot water or scrubbing over a patch, and pat the area dry.
This article is for general information and isn't medical advice. P-Protect has not been evaluated by the FDA and is not intended to diagnose, treat, cure or prevent any disease. Affiliate disclosure.